
Chestnut craft ideas? Find out super cute DIY fall decoration projects for young and old!
Chestnuts are not only ideal for roasting on an open up hearth, but also as a decoration in the slide and winter season months. These heat, chocolate colored gems will increase some woodland allure to your home. Not only do they bring an organic, all-natural really feel, but they are also regarded to preserve spiders and moths away! There are so lots of different chestnut craft strategies! You can buy chestnuts in most supermarkets, but if you want an authentic feel you can select them oneself! And what can you make from chestnuts? You should browse on!
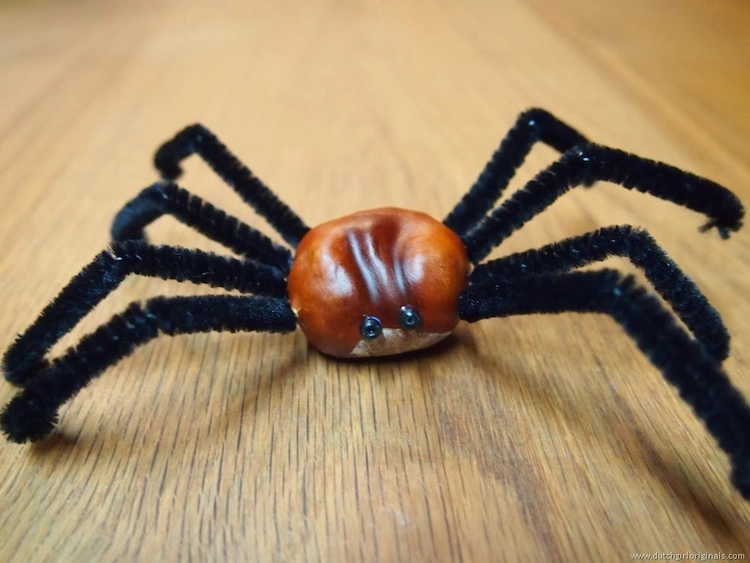
Do-it-yourself Chestnut spiders – exciting crafts for small children
Ads
Resources essential:
Of training course you can also make these spiders with sticks or toothpicks, which you break in the center to variety the legs.

Ads
Recommendations:
- Reduce the pipe cleaners into 8 pieces. You can slice them in fifty percent and then cut them in 50 % again.
- Make 8 holes for the legs and glue the pipe cleaners in. Make confident the holes are deep adequate so they have a little something to “hold onto”.
- Scratch the shiny floor of the chestnut to assistance the eye glue adhere and incorporate the googly eyes.
Chestnut craft thoughts – Diy drop wreath

Supplies and resources required:
- 100+ chestnuts (picked or shop purchased)
- Wreath foundation (you can make your have wreath base or get one particular at the supermarket)
- Hot glue gun (You will need to have 10 glue sticks for this job)
- Tape to connect the wreath to a door or wall

Diy Chestnut wreath stage-by-action guidelines:
- Get all the materials and plug in the warm glue gun to make confident it is heated up prior to beginning the undertaking.
- Clean and dry all the chestnuts. This is important to ensure that any dust is taken off.
- Tie the top ribbon (if your wreath base does not already have just one).
- Put a dab of very hot glue on one particular chestnut (the flat facet is ideal) and press it into the wreath base. Maintain the chestnut for a handful of seconds to make confident it stays in area.
- Glue the chestnuts to the best and sides of the wreath base, the back stays free of charge. This way the wreath is uncomplicated to hold and there is no threat of the wreath falling aside. Repeat the procedure for just about every chestnut (only 1 at a time) till you have protected the total wreath with chestnuts.
- Allow the glue to dry in advance of attaching the bow. For the bow, consider jute ribbon or a broad ribbon and make a large bow. To attach the bow to the wreath, choose a extensive strip of ribbon and tie it all-around the heart of the bow, then tie the finishes of the ribbon all around the bottom (or top rated) of the wreath.
- Hang your new chestnut wreath and get plenty of images!
Chestnut craft thoughts – How to make a coronary heart

Elements and tools wanted:
- Chestnuts
- String or wire
- Scissors
- Hammer
- Extensive nails
- Cutting board
Make sure you have an grownup prick the chestnuts.
Recommendations:
- Insert the nail into the heart of the chestnut and hammer through until finally the nail shows on the other side. Hold accomplishing this right until all the chestnuts are pierced.
- If using wire, it is most effective to bend the metal into a heart condition.
- Thread the chestnuts one by one on to the well prepared wire form.
- Dangle on the mantel or on the wall to insert a loving touch to your home.
How to make a cute garland from chestnuts?

Components and instruments essential:
- Plastic fishing line
- Clean chestnuts
- Leather-based line
- Thin nail
- Hammer
- Huge plastic needle
- Scissors
- Oven or food items dryer

Recommendations:
- Use a hammer and nail to punch a hole in the middle of each individual chestnut. Some chestnuts are so soft that you can crush the shell with your fingers. Other folks have to have a hammer to push the nail in.
- After building the to start with gap, insert the plastic needle into the gap and pull it out the other aspect. The hole should be huge and absolutely free.
- Dry the chestnuts. If you have a dehydrator, set it to the cheapest location and permit it operate for at the very least 3 days. If you don’t have a dehydrator, established your oven to the most affordable setting and dry the chestnuts on a baking sheet in the oven for 5-6 hrs. The longer you can depart them in the oven, the shorter the ultimate drying time. Remove the chestnuts from the oven and permit them air dry for 3-7 days. The chestnuts are rock challenging when completely dried.

- The moment the chestnuts are dry and great, thread them onto the fishing line with the plastic needle.
- Slice the leather wire into 12 cm extended pieces. You need a piece for every chestnut, and an excess piece.
- Starting at a person finish of the garland, tie a piece of leather-based wire among each individual chestnut.
- Tie off the fishing line at both equally finishes. It is least complicated to tie the fishing line through with the leather strip at each finishes to keep the knot safe.
- Wrap the garland around the railing, or hold it on the wall or doorway and appreciate the refreshing fall mood at dwelling!


/cdn.vox-cdn.com/uploads/chorus_asset/file/19624303/edited_LRB_110812_6348_2.0__1_.jpg)