
How to Build a Pallet Wood Wall

We’ll demonstrate you how to establish a pallet wood wall with this stage-by-stage tutorial.
When you have finished, use your leftover pallet wood to make wooden hearts and lawn dominoes, or to establish objects to manage your household.
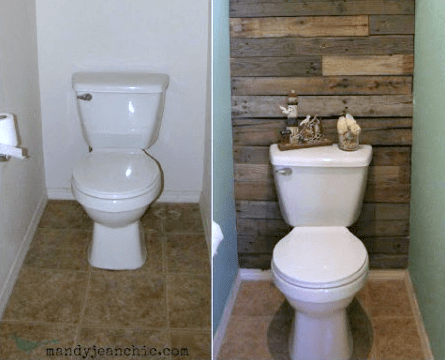

Mandy Jean Chic shares this tutorial for adding a pallet wall in a little bathroom, but the method is very substantially the exact for any wall in any area. Use fence slats, barn wood, pallets, whatsoever old lumber you can get your fingers on! Check out for Mandy’s insider tips (marked in bold) so adding your pallet wood wall will go smoothly and conclude fantastically.
How to Construct a Pallet Wood Wall
Action one: Acquire Aside the Pallets
The most difficult part of this undertaking, by significantly, is not breaking the boards when dismantling the pallet. Be guaranteed to use your protection equipment and consider to help you save a couple of of the old nails to reuse to make your pallet wall appear authentic. Gloves and eye security are a should for this undertaking!
Related Looking at: How to Acquire Aside a Pallet Devoid of Losing Your Head

Action 2: Measure your wall and wood
Obtain the square footage of the wall by taking the height and width of the wall in ft (spherical up to the future foot for simplicity) and multiply the two quantities. Then lay out the boards and measure them to make sure you have enough to protect the essential square footage on your wall. Laying them out also provides you an strategy of how they will suit with each other on your pallet wall.

Action three: Paint the wall
Paint the wall behind the wood because in this software there will be cracks and gaps that add to the rustic appear. For this wood, a blue grey or silver would have increased the blues and grays in the sun-bleached temperature-exposed wood. Browns would make the wood appear a lot more employed but not as old. We employed black to get the appear of emptiness behind the pallet wood wall. No make a difference the color you go with, it is vital to use a flat sheen to limit any shine. It must appear like an old wood wall, not a new shiny wall coated by old wood.

Action 4: Commence adding boards to the leading of the wall, work only part way down
Working with a fantastic adhesive (liquid nails) and a couple of of the old nails, start at the leading of your pallet wall and work your way down. Partitions are never perfectly square so just take length measurements for each individual row. Stagger some of the boards by reducing at distinctive lengths, being guaranteed to pair up boards of matching heights. Use a couple of total-length boards to add security to the random pattern. It is also vital to feel a couple of actions ahead and lay out your future couple of boards to match up the heights. If a board you put is a large amount taller or shorter than the 1 you are pairing it to, you will have a pretty uneven hole. Tiny gaps can add to the appear, but gaps that are much too big will leave your pallet wall hunting improperly imagined-out.
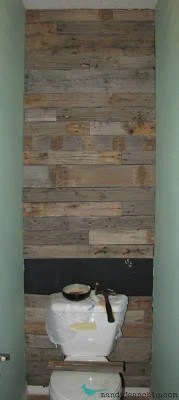
Action five: Commence adding boards from the base up to make space to blend in a small board or two
Odds are your boards will not suit evenly leading to base on your wall and you will require to slash a board horizontally to match the height of the last hole on the pallet wood wall. As we have been doing work in a bathroom, inserting this shorter board behind a set item like the toilet served it be a lot less recognizable. We also slash two boards 2 inches shorter instead of shortening just 1 board by 4 inches. We spaced out the shorter boards and they never capture your eye at all!

And which is how to establish a pallet wood wall! Does not the finished product or service appear great?! No a lot more uninteresting, flat wall and so substantially extra texture and heat and temperament!
Love this appear? Click on the back links under to verify out a lot more reclaimed wood jobs we’ve highlighted.
Be sure to pin this for later on and also come adhere to along with us on Pinterest, Fb, Instagram or YouTube for tons of remodeling, decorating and building tutorials.

At first published 03.23.2013 // Current 04.13.2019


