
Build a Custom Banquette Corner Bench
Free up place in your kitchen and increase seating with a customized banquette corner bench that you can build to suit your place. It can even increase storage if you need to have that!
Other wonderful kitchen concepts that are a wonderful addition to this banquette corner bench: a rustic bench, increase a crafted-in breakfast bar, or increase a faux brick backsplash.


Banquette Bench Inspiration
On the lookout for more banquette inspiration? Look at out these banquette benches we appreciate, and scroll down for the information of Chelsea’s banquette corner bench building.
 Constructed-in Banquette and Shelf | Grey Puppy Designs featured on Remodelaholic
 Constructed-In Breakfast Banquette from Recycled Cupboard | Accessorize and Arrange featured on Remodelaholic
 Corner Banquette | by way of Far better Houses and Gardens
 Eclectic Cottage Banquette Nook | by way of Condominium Treatment
 8 Tips for a Sunny Corner Banquette | Remodelaholic (impression by way of BHG)
(moreover seven more suggestions for a vintage banquette bench from Remodelaholic)
Build a Customized Corner Banquette Bench
by Chelsea the Pinterior Designer

We have a bigger kitchen, which I’m not complaining about, there is just a lot of open up place and our hand-me-down table was wanting a little lonely. I came up with the genius notion to build our personal banquette to suit into our place perfectly.

We went to Lowe’s to obtain our supplies. We weren’t one hundred% guaranteed what all we desired, but made the decision we’d just retain wanting till we figured the challenge out. I imagine which is the mystery to this full Do it yourself point. We’ve acknowledged that we’re not authorities and that we will most possible run into difficulties alongside the way. Preserving that perspective in thoughts can help us settle for the actuality that we will mess up and our assignments will not usually look great at initial, but not to give up. We left Lowe’s with a vehicle complete of supplies

Listing of supplies and resources:
Supplies:
- 2 sheets of plywood (we had Lowe’s rip the boards in fifty percent so we could suit it in the vehicle)
- 1 sheet of veneer plywood to use for the front of the bench
- 2 – 1 x 10 x 8 boards (for the best of the bench)
- 10 – 2 x three studs for the body
- 8 – 1 x 3s for the trim and supporting the headboard
- Metal brackets + nuts and bolts to attach the headboard
Equipment:
- Electrical power Sander (or just sand paper)
- Miter Noticed Nail Gun + Air Compressor (we wish we had a complete nailer for this challenge although)
- Circular Noticed
Making Tutorial
The initial move was to get rid of the baseboard and build the body. If you can build a box, then congratulations! You can do this challenge!
Use a miter saw to reduce your 2 x 3s to the accurate measurements. We reduce our boards to a length of seventy six inches extensive and the width of the assistance pieces were being seventeen.five inches. If we could redo the banquette, I would have completed this component differently! I am the literal worst at measuring. We should really have created the assistance pieces only 15 inches extensive because our banquette is a little as well tall when you increase the 1 x 10s and the cushion. You gain some, you eliminate some.
Mainly because we did not have the accurate resources, we created way more perform for ourselves. So annoying. Each time we connected 2 x 3s jointly, we held them in position with a brad nail, then went back again with the drill and secured them with three.five inch wood screws. We had a complete nailer in our cart at Lowe’s but made the decision not to pull the bring about (pun supposed) on the obtain. Soon after several hours of drilling, we were being kicking ourselves for not biting the bullet and just getting it.

The moment the initial body was crafted, we recurring it for the other aspect of the banquette, but only created the length 70 inches extensive to suit in the place we had. The upcoming move was attach the 2 frames jointly with the wood screws.

From there, we included the front of the bench which was a veneer board. Slice the board making use of a circular saw and attach it to the front making use of a brad nail gun. Considering that the veneer is so slender, which is all it desires to continue to be in position. We made the decision not to complete the back again aspect of the banquette because no 1 would at any time see it. Why do more perform for no purpose?!

Next up was incorporating the trim. I needed to retain the trim contemporary and coordinate with the board and batten we have in our dining space. We reduce the 1 x 3’s making use of the miter saw and connected making use of the nail gun only. To start with, we included the exterior border of the trim, then we went back again and included the vertical pieces which were being twelve and six/8 extensive. The conclude pieces were being 14 inches across by 18 inches extensive.

Next up, we connected the headboards which were being also customized-created. I scoured Pinterest for inspiration and ended up with a belgrave formed design. I drew my design on a piece of poster board and traced it on each individual aspect. Using the circular saw, we reduce out the pattern. The headboards sizes are seventy six x 25 and 70 x 25.
Then, I adhered 1.five inch foam from Joann’s with spray adhesive. Address the whole headboard with batting and attach with a staple gun.
Then, upholster the headboard with material. I utilized a faux vinyl-like clearance material from Joann’s that price about $twelve for every garden. I bought 4 yards just to be safe and I have a great deal left above. This was 1 of my initial occasions hoping to upholster nearly anything and there was a ton of demo and mistake involved. Brooke, from All Things Thrifty, has a ton of wonderful tutorials so I wouldn’t have been ready to finish this challenge if it was not for her wonderful guidelines.
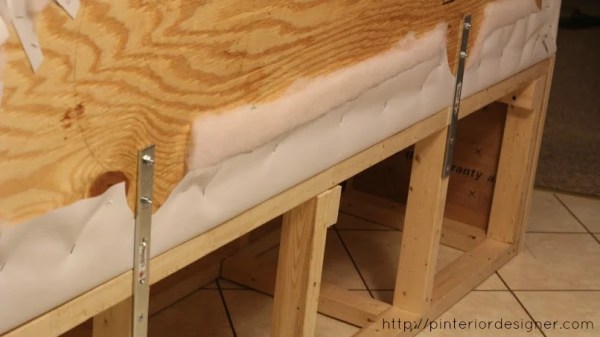
To attach the headboard we utilized two unique techniques. For the left bench, we utilized metallic brackets that we bought from Lowe’s. We selected the brackets because the bench desired to sit flush in opposition to the wall and this authorized there to be practically no hole between the bench and the wall.
Ahead of upholstering the headboard, Nate drilled a gap for the bolt, caught it through, and screwed the nut on to retain it in position. The moment it was time to attach the headboard, we just taken out the nut, slide the bolt into the metallic bracket which we connected to the bench, and screwed the nut back again on. Sorry I never have any photographs of this component.
For the right bench, we concerned about the window right at the rear of the headboard. We did not want anybody to accidentally split the window by leaning as well challenging into it. To increase more stability, we connected three 1 x 3s to the bottom of the bench. We then screwed the 2 x 3s into the headboard making use of the identical wood screws as the body.

Next, reduce and attach the 1 x 10s to the best of the bench body with wood screws.
From there, it was just ending perform! We sanded down all of the trim pieces to make them look related. I caulked all of the seams, spackled then sanded nail and screw holes, and then prepared to paint.
I painted the bench Extremely White by Valspar in semi-gloss which is what I use on all the trim in our residence. I had to be tremendous very careful about the headboard and I really wished I would have painted it before I connected the whiteboards.

To build the bench, I utilized the identical procedure as the headboard. I reduce a piece of plywood making use of the circular saw, connected three inch foam making use of spray adhesive, included the full point with batting and stapled it down making use of a staple gun, and lastly included it with black material. I cannot recall the name of the material, but it was just a essential black cotton that price much less than $five a garden. I selected simple black and white colours because I needed to have a clear backdrop to pair with getaway table configurations and patterned pillows. I needed to be ready to decorate the table any way I needed with no owning to fret about matching the banquette.

The challenge took us 1 weekend to finish with a great deal of breaks in between. There was unquestionably a studying curve involved + WAY as well quite a few excursions back again to Lowe’s, Joann’s, and A.C. Moore to decide up more supplies. Ideally this tutorial will aid spare you some of the difficulties we encountered alongside the way.
The complete price was about $250, which we were being really pleased with because when you imagine about it, we now have a piece of furnishings that fits perfectly, maximizes the place we have, and will work perfectly with our design fashion. I’d get in touch with that a gain!


Soon after you build a banquette corner bench, you may want a new dining table to build or obtain. Not guaranteed what top to build your bench, we have acquired suggestions for acquiring the right top.
Make sure you be guaranteed to pin this challenge for afterwards reference:


————————————————–
Thanks for remaining our visitor, Chelsea! Love the banquette!
Hi. I’m Chelsea and I’m addicted to Do it yourself. Appropriate now, I’m imagining you all responding with the cliché choral reaction of “Hi, Chelsea.” It is real, although. I am addicted to Do it yourself and I’m not afraid to say it. I generate a rather new blog site called Pinterior Designer where I share how to’s and tales about how I’m little by little upgrading my builder essential residence 1 challenge at a time. Unfortunately for my spouse, Nate, I Do it yourself on a whim so he’ll normally occur residence from a vacation or a extensive day of perform to coated counter tops or a repainted visitor space with a faux picture body design. I have learned that I cannot manage the insane, so I’m just embracing it. I’m not fairly guaranteed if he feels the identical way…
Initially published 1.three.2014 // Current three.25.2020


